

You can pull hard, knock out pull-ups, and still fold like a lawn chair when you try a front lever. Annoying? Yep. Normal? Yep.
The front lever asks for much more than a strong back. You need straight arm strength, hard body tension, shoulder control, and enough patience to stop every session from becoming a fight with gravity.
Many athletes jump from tuck front lever attempts toward full front lever calisthenics work. They skip the unglamorous middle stages, then wonder why their elbows bend, hips drop, and shoulders ache. Start with the steps in between.

Why the front lever feels so brutal
The front lever holds your whole body horizontal beneath a bar or rings. Your lats, rear shoulders, core, glutes, and straight arm pulling muscles all fight gravity at once. Your grip joins the struggle too.
Unlike a pull-up, the front lever requires you to hold position with locked elbows. That requirement changes the exercise. Strong pull-ups help, but they do not automatically build the shoulder extension strength and full body tension that a solid front lever requires.
Picture a plank turned sideways and suspended from your hands. It sounds manageable until you try it. Physics has a sense of humor.
The muscles that do the heavy lifting
Your lats drive the hold by pulling your upper arms down toward your torso. Your lower traps and scapular stabilisers control your shoulders, while your core and glutes keep your hips from sinking.
Your biceps, forearms, and connective tissues take a heavy straight arm load too. Build tolerance gradually. Your elbows and shoulders will not enjoy a sudden hero phase.
- Lats: keep your torso level and create most of the pulling force.
- Scapular depressors: pull your shoulders away from your ears.
- Core and glutes: hold your ribs, pelvis, and legs in one line.
- Biceps and forearms: support the straight arm hang and your grip on the bar.
- Hip flexors: help you control tuck and straddle positions.
The National Strength and Conditioning Association writes regularly about progressive loading and sound movement quality in strength training. That approach matters here far more than a flashy Instagram clip. Control the position before you lengthen the lever.
The prerequisites most people ignore
Before you start a front lever progression, build a base that gives your joints a fair chance. You do not need superhero strength, but you do need control. If you cannot hang comfortably, start there.
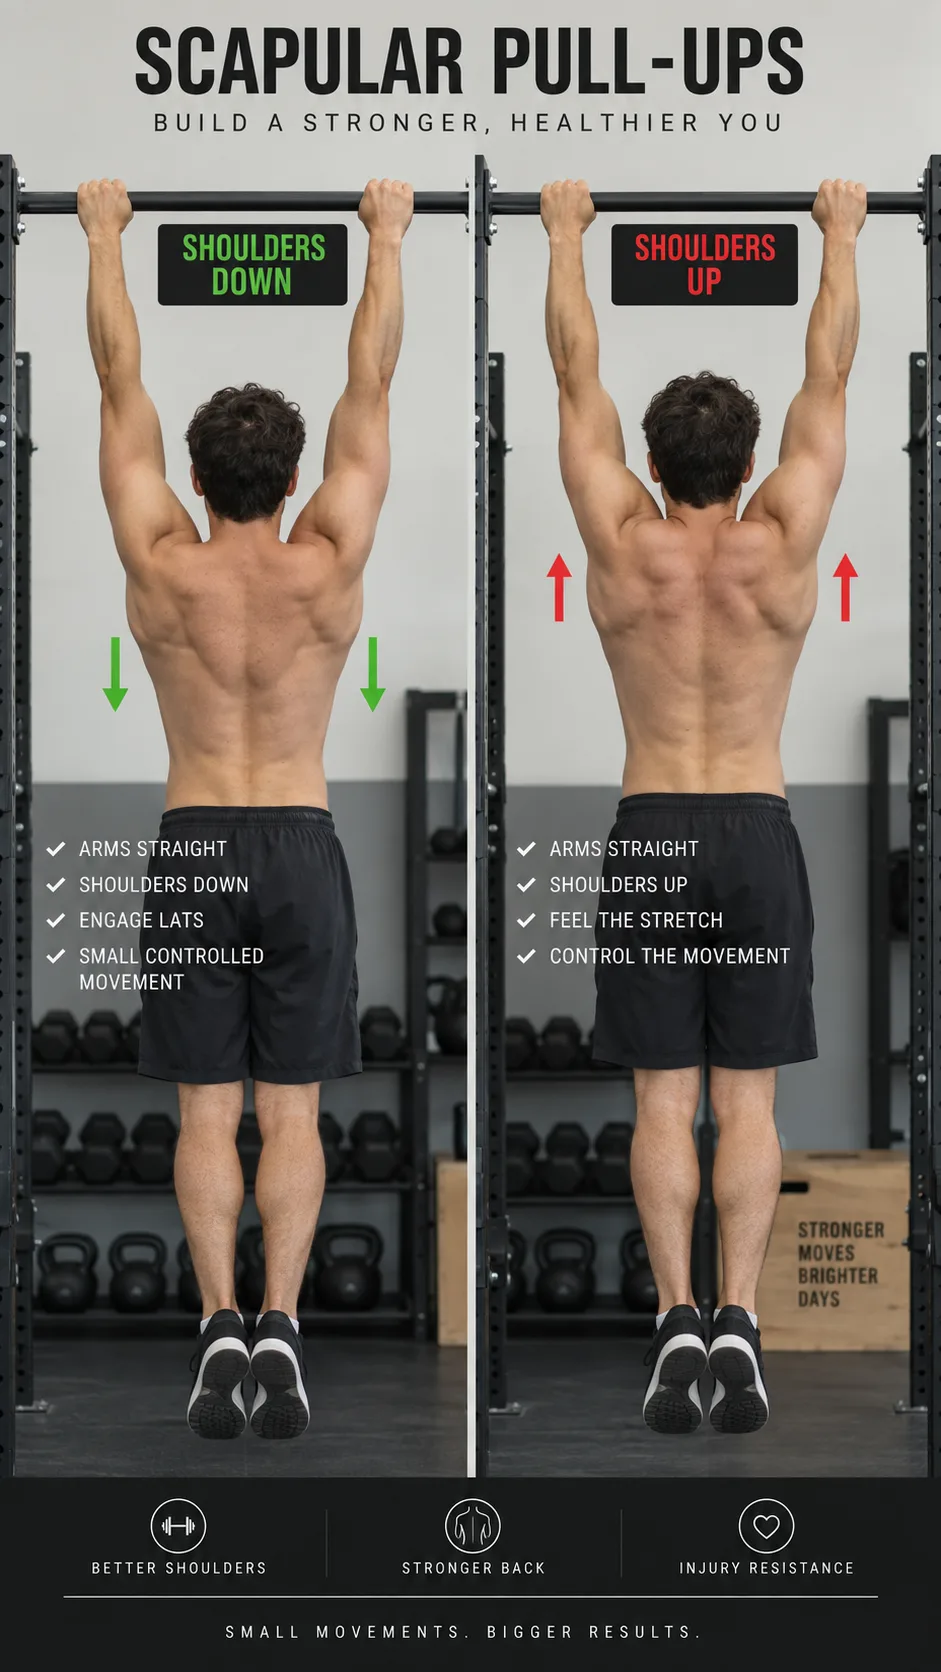
Begin with a dependable dead hang, controlled scapular pulls, and clean pull-ups. If pull-ups still feel unpredictable, follow this pull-up progression from dead hang to your first rep first.
Your front lever readiness checklist
- Hold a relaxed dead hang for 30 to 45 seconds without sharp pain.
- Perform 8 to 12 controlled scapular pull-ups with straight elbows.
- Complete 5 to 8 strict pull-ups through a comfortable range.
- Hold a hollow body position on the floor for 20 to 30 seconds.
- Keep your shoulders comfortable during hanging and straight arm drills.
These numbers do not work as magic entry tickets. They show that you have enough basic control to train well. Your form, recovery, and shoulder history matter more than winning a checklist contest.
The American College of Sports Medicine supports gradual progression and regular strength work for healthy adults. In front lever training, gradual progression means you increase difficulty only after you control your current hold.
The front lever progression roadmap
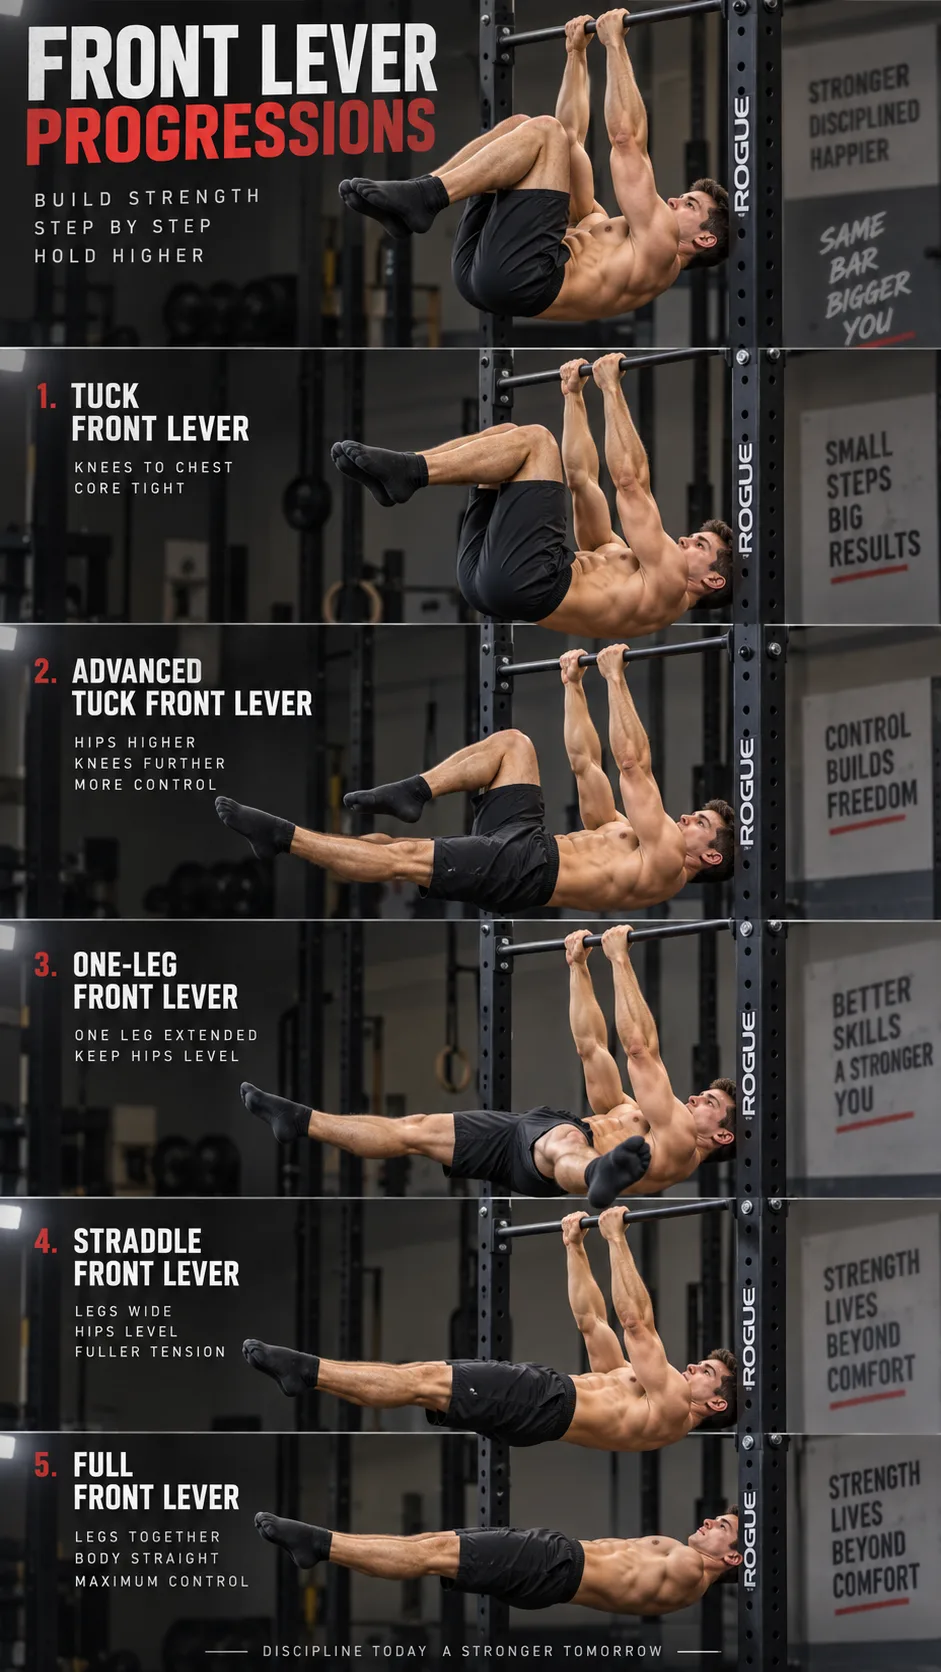
This front lever roadmap changes leverage in small, sensible steps. Every stage teaches the same skill: pull your shoulders down, lock your arms, brace your torso, and keep your body from peeling away from the bar.
Do not rush through the stages because one lucky hold felt decent. A three-second shape that you hold through panic does not show control. Consistent, clean holds beat “almost had it” attempts every time.
1. Tuck front lever
Grab the bar with an overhand grip, then pull your shoulders down and slightly back. Pull your knees tight toward your chest and lift your hips until your torso sits roughly parallel to the floor.
Keep your elbows locked. Squeeze your abs and glutes, and think about driving the bar down toward your hips. Hold for 5 to 10 clean seconds before you increase the difficulty.
If your hips drop, pull into a tighter tuck. If your arms bend, stop and reset. Your ego does not need another rep. Your technique needs a better one.
2. Advanced tuck front lever
The advanced tuck front lever brings the first big jump in difficulty. Keep your knees bent, but move them farther from your chest. Your back should look flatter and more horizontal than it did in a standard tuck.
This stage exposes weak core tension quickly. Pull your ribs down, avoid a big arch, and keep your shoulders depressed. You should feel your lats and abs working together, rather than your lower back drafting a resignation letter.
Aim for 3 to 5 sets of 8 to 12 seconds. When you can repeat those holds with clean form across several sessions, move forward.
3. One-leg front lever
From an advanced tuck, extend one leg straight while you keep the other knee tucked. Switch legs each set. The straight leg lengthens the lever, so your lats and core face a more demanding test.
Keep both thighs tight and point your toes. Do not twist your hips toward the tucked side. A small hip twist often tells you that one side of your back or core needs more attention.
Use 5 to 10 second holds on each side. You can also perform slow one-leg front lever raises for two to four controlled reps.
4. Straddle front lever
The straddle front lever creates a useful bridge between one-leg work and the full position. Extend both legs, then spread them wide. A wide straddle shortens the effective lever and lets you practise a nearly full body line.
Keep your knees straight and your hips level. Many athletes rotate their hips or let their legs drift behind them at this stage. Film yourself from the side if you can. The camera catches what enthusiasm misses.
Build toward 8 to 12 second straddle holds. Narrow your straddle gradually instead of jumping straight into a full front lever.
5. Full front lever
In a full front lever, your body forms one straight horizontal line from shoulders to ankles. Lock your elbows, pull your shoulders down, brace your abs, squeeze your glutes, and point your toes. Every inch counts.
Begin with short holds of 3 to 5 seconds. Build total clean time first, then work toward longer unbroken holds. A clean 10-second front lever demonstrates serious strength and control.
How to train each stage without stalling
Train front lever work two or three times each week. Put it near the start of your workout, after a short warm-up, because fresh shoulders help you hold cleaner positions. Save high repetition pulling work for later.
Most athletes progress with 30 to 60 seconds of total clean hold time at their current stage. Spread that time over several sets. Six sets of eight seconds will help you more than one ugly 25-second hold.
A simple front lever workout
- Warm up for 5 to 8 minutes: use dead hangs, band pull-aparts, shoulder circles, and scapular pull-ups.
- Do your main holds: complete 4 to 6 sets of your hardest clean progression for 5 to 12 seconds.
- Add front lever raises or negatives: perform 3 sets of 2 to 5 slow reps.
- Finish your pulling work: complete 3 to 4 sets of rows, pull-ups, or lat focused exercises.
- Train your core: use hollow holds, hanging knee raises, or body saws for 2 to 3 sets.
Rest two to three minutes between hard sets. Front lever training challenges your nervous system and connective tissues along with your muscles. When you rush your rest, you turn technical strength work into a wobbly endurance contest.
You can build a stronger hollow body position through beginner friendly pushing work too. This push-up progression for beginners teaches trunk bracing and shoulder control that carry over well to calisthenics skills.
Common front lever mistakes and fast fixes
When your position falls apart, you do not need more random exercises. Find the leak. Fix it, then earn the next progression.
- Bent elbows: reduce the difficulty, practise scapular pulls, and use shorter clean holds.
- Hips sagging: tighten your hollow body position and shorten the lever with a deeper tuck.
- Shoulders shrugging: think “push the bar toward your hips” and practise active hangs.
- Lower-back arch: pull your ribs down and squeeze your glutes before you lift.
- Wild swinging: begin each set from a completely still hang and stop chasing extra seconds.
- Elbow or shoulder pain: reduce your volume immediately and seek guidance from a qualified clinician if pain continues.
Sharp pain never earns bonus points. The American Academy of Orthopaedic Surgeons encourages sensible exercise progression and attention to pain signals. Respect those signals before a small irritation forces a long break from training.
Front lever questions athletes ask all the time
How long does it take to achieve a front lever?
Most people need months, and many need a year or more of consistent work. Your bodyweight, training background, limb length, recovery, and technique all affect the timeline. Put your attention on the quality of your weekly training instead of a deadline.
Can you learn a front lever with bands?
Yes. Resistance bands can help you learn the right body line while they take away some load. Use bands to learn the movement, not to hide poor form. Keep your positions strict and reduce assistance over time.
Should you train front lever every day?
Most athletes should avoid hard front lever holds every day. Your shoulders, elbows, and biceps tendons need recovery. You can do light mobility and easy scapular work more often, but intense holds need rest.
Build the skill, don’t just attempt it
The front lever rewards patience more than bravado. Build your dead hang, master the tuck, control the advanced tuck, and extend your body one step at a time. The roadmap may feel slow, but it beats spending six months “trying” a full lever with bent arms.
Train the progression you can control today. Come back, add a second or two when your form earns it, and let the full front lever arrive on your schedule, not your ego’s.