

Can’t do a full push-up yet? Good. Start where you are.
Many beginners drop to the floor, try one heroic rep, stall halfway down, and decide push-ups “aren’t for them.” That plan makes about as much sense as trying to run a marathon before you walk around the block.
This wall-to-floor push-up progression builds strength, teaches solid form, and gives you a clear route to your first proper floor push-up. You will train your chest, shoulders, triceps, core, and confidence without arguing with gravity through every workout.
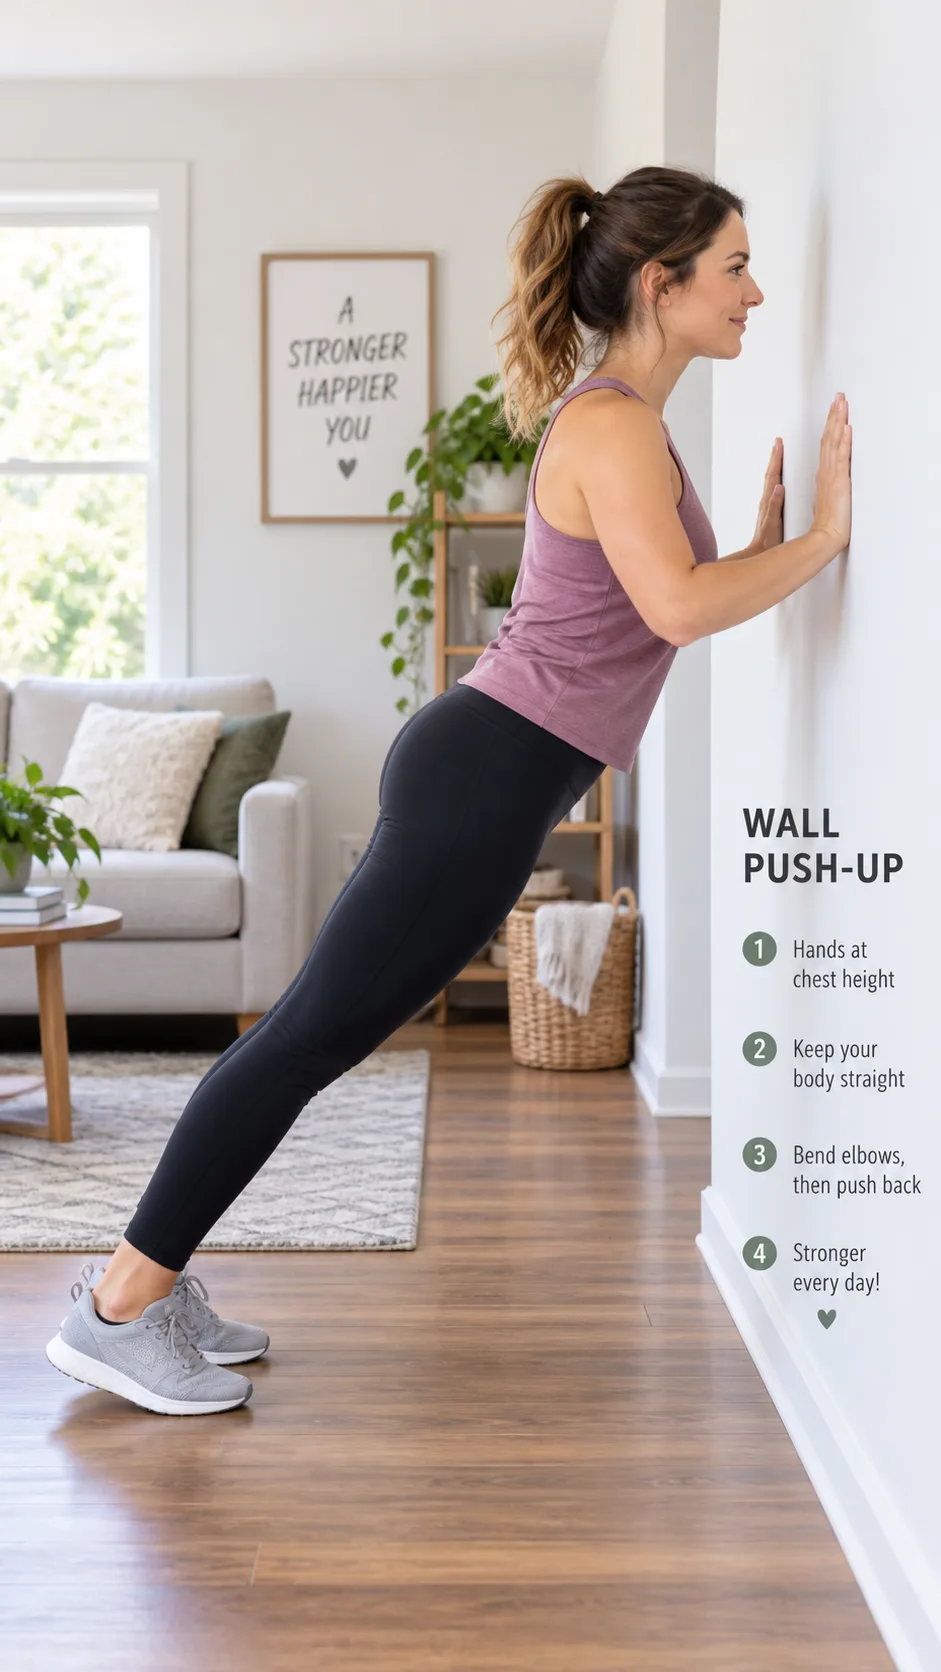
Why beginners struggle with push-ups

A standard push-up asks your upper body to move a large share of your body weight while your core keeps everything steady. Your chest and arms drive the press, while your abs, glutes, shoulders, and upper back hold your position.
That full-body effort explains why push-ups feel so hard at first. You do not lack willpower if you cannot do one yet. You need a sensible way to build strength.
A good beginner push-up plan lowers the load first, then raises it bit by bit. A wall push-up puts far less body weight on your arms than a floor push-up. An incline push-up fills the space between them.
Strength training matters for more than appearance. The Centers for Disease Control and Prevention recommends muscle-strengthening work at least two days each week for adults. Push-ups offer a practical way to work toward that goal without equipment.
Start with the push-up form basics
Learn the movement before you chase a rep count. Good reps build strength. Sloppy reps find new ways to irritate your shoulders.
Your beginner push-up setup
- Place your hands slightly wider than shoulder-width apart.
- Point your fingers forward, or turn them out a little if your wrists prefer that position.
- Make a straight line from your head through your hips and heels.
- Squeeze your glutes and brace your stomach gently, as if someone plans to poke your ribs.
- Pull your shoulders away from your ears and keep your chest up.
- Lower your chest toward your hands while your elbows move about 30 to 45 degrees away from your torso.
- Press the surface away until your elbows straighten, without forcing them hard into lockout.
Keep your neck neutral and look slightly ahead of your hands instead of down at your feet. Your body often follows where your eyes go.
Think “a moving plank,” not “my arms doing all the work.” That cue helps many beginners avoid sagging hips and a butt that rises toward the ceiling.
Common push-up mistakes to avoid
- Dropping your hips: Squeeze your glutes and use a shorter range if you need one.
- Flaring your elbows wide: Angle your elbows slightly back so your shoulders feel steadier.
- Leading with your head: Move your chest and hips together as one unit.
- Rushing each rep: Lower under control so your muscles carry the load.
- Holding your breath: Inhale as you lower and exhale as you press up.
If you feel sharp pain in your wrist, elbow, or shoulder, stop that variation. Muscle effort feels normal. Joint pain does not need a motivational speech.
The wall-to-floor push-up progression
Use this order to build beginner push-up strength. Move to the next stage when you can complete the target reps with controlled, steady form.
Most people need several weeks to move through these stages, and some need longer. Your muscles do not care about the date on your calendar.
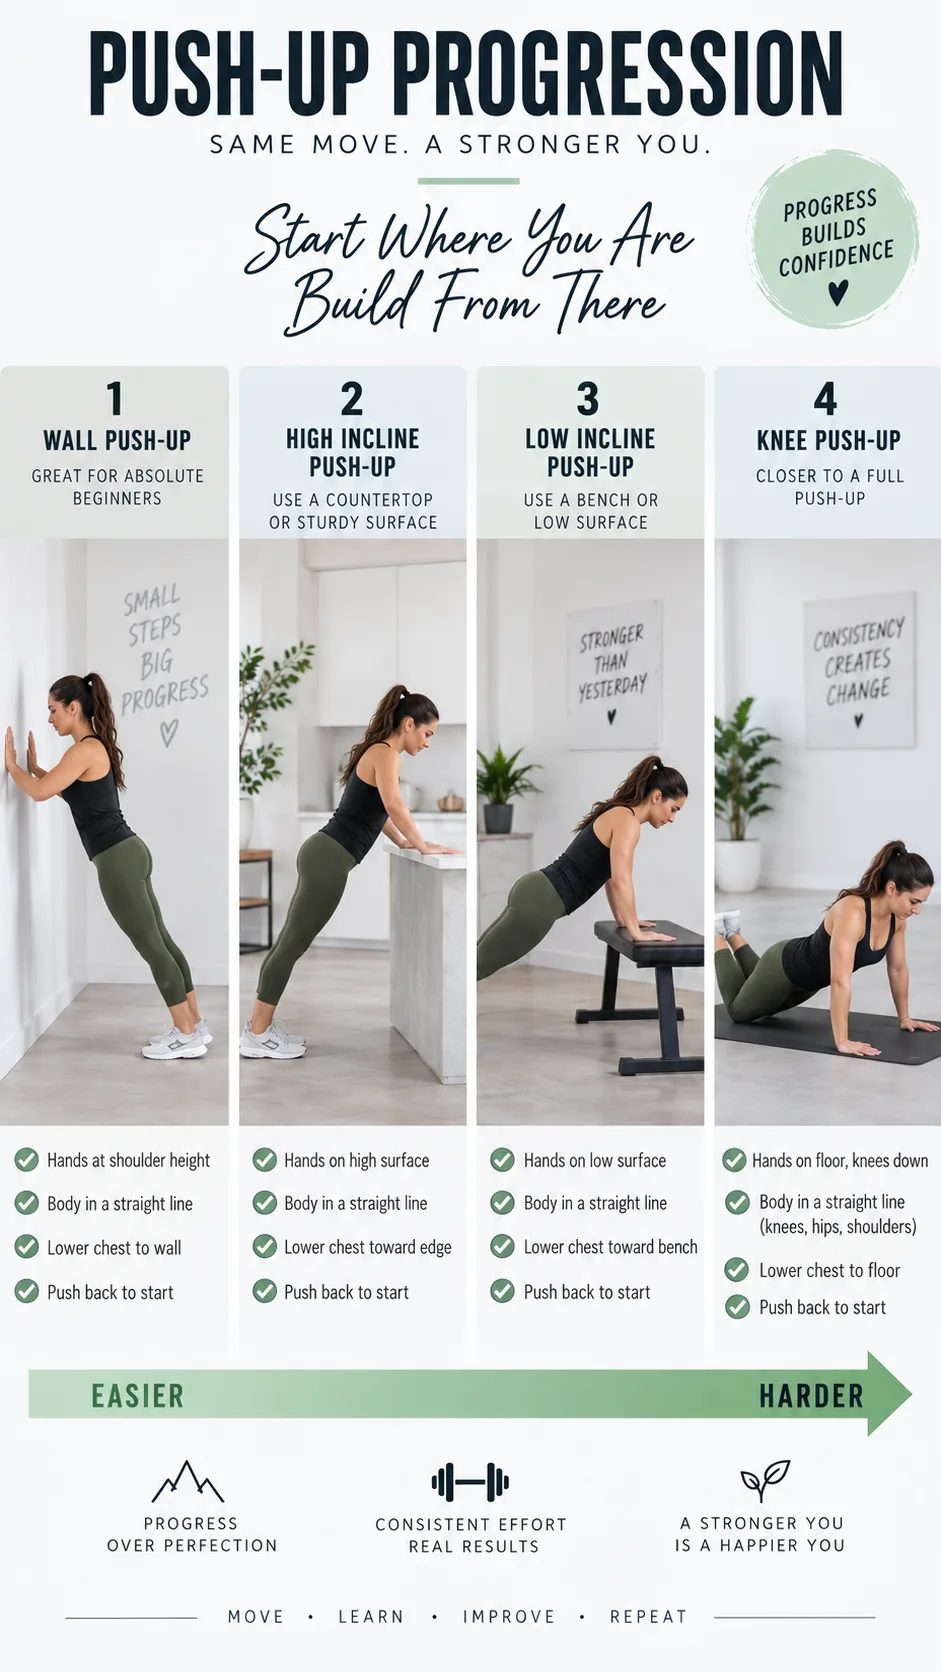
1. Wall push-ups
Wall push-ups give you the simplest place to learn the movement. Stand about an arm’s length from a sturdy wall, put your hands at chest height, and step your feet back until your body makes a straight line.
Lower your chest toward the wall, pause for a moment, then press back. Keep your heels on the floor if you can, but put your straight-body position first.
Aim for 2 to 3 sets of 8 to 15 wall push-ups. When 15 reps feel smooth and you have more in the tank, step farther from the wall or switch to an incline.
2. High incline push-ups
Use a kitchen counter, sturdy table, or fixed rail for high incline push-ups. As your hands move lower, your arms must press more of your body weight.
Pick a surface that will not slide or tip. Start high and use the same form you learned at the wall.
Complete 3 sets of 6 to 12 reps. When you can hit 12 strong reps in every set, lower the incline a little.
3. Low incline push-ups
Use a stable bench, couch arm, or low bar for this stage. This version often gives beginners a real confidence boost because it looks and feels closer to a regular push-up.
Take two or three seconds to lower yourself. That slower descent builds strength in your chest, triceps, and shoulders and teaches your body to stay tight.
Work toward 3 sets of 8 to 12 low incline push-ups. If your hips sag, raise the surface and master the easier version first.
4. Knee push-ups
Knee push-ups lower the load, but they still require solid upper-body strength. Put a folded mat or towel under your knees, place your hands under your shoulders, and hold a straight line from your head to your knees.
Do not bend at your hips and turn the exercise into a strange half-push-up, half-worm. Squeeze your glutes, brace your stomach, and lower your chest toward the floor.
Complete 3 sets of 5 to 10 controlled knee push-ups. Add a slow three-second descent when regular reps start to feel manageable.
5. Negative floor push-ups
Negative push-ups let you practice the hardest half of a full rep. Start at the top of a standard push-up, lower yourself over three to five seconds, then put your knees on the floor before you press back up.
Your body gets stronger during the lowering phase, especially when you control it. Research reviews also show that eccentric training can improve strength, though you should raise your volume slowly because it can leave you sore.
Perform 3 to 5 negative reps with excellent control. Rest for 60 to 90 seconds between sets so you can keep an honest body position.
6. Your first full push-up
Set up in a high plank with your hands slightly wider than your shoulders. Lower your chest and hips together, bring your chest close to the floor, then press the floor away.
One clean floor push-up beats ten shaky almost-push-ups. Enjoy that first rep, then return to incline or knee push-ups to build more volume.
Try one or two full push-up attempts at the start of each workout, when you feel fresh. You learn technique faster when fatigue does not take over.
Follow this beginner push-up workout plan
Train push-ups two or three non-consecutive days each week. Your muscles grow and adapt while you recover, so daily max-out sessions usually bring more frustration than progress.
- Warm up for 3 to 5 minutes: Roll your shoulders, circle your wrists, and do a few easy wall push-ups.
- Choose your current variation: Pick the hardest version that lets you complete clean reps.
- Do 3 working sets: End each set with one or two good reps left in reserve.
- Rest 60 to 90 seconds: Shake out your arms and reset your form.
- Add one rep each week: Move to a lower surface after you reach the top of the rep range.
For example, you might begin with three sets of eight wall push-ups. Next week, aim for three sets of nine, then ten, until you reach 15 and move to a counter.
Small improvements that you repeat lead to progress. You do not need to destroy yourself to get stronger. You need to practice often enough for your body to respond.
Pair this plan with a beginner pull-up progression if you want balanced upper-body strength. Push-ups train your pressing muscles, while pulling exercises build your back and biceps and support good posture and shoulder health.
Build more strength for better push-ups
Push-ups improve faster when you train the muscles that support them. You do not need a gym membership or a soundtrack that makes you feel like an action hero.
Helpful exercises for push-up beginners
- High planks: Hold for 15 to 30 seconds to build a stronger brace.
- Dead bugs: Teach your core to resist arching and twisting.
- Shoulder blade push-ups: Keep your arms straight and move only your shoulder blades to build control.
- Rows: Use a resistance band, dumbbell, or sturdy setup to strengthen your upper back.
- Triceps extensions: Add light resistance if your arms give out before your chest.
The NHS strength and flexibility guidance also encourages people to build strength steadily and choose exercises that fit their ability. Start where you are, not where someone else records their tenth set online.
Mobility can help when tight wrists or shoulders limit your setup. Do gentle wrist circles, chest stretches, and shoulder movements before training, but do not force a painful range.
If you want to improve whole-body control, try this safe backbend progression on separate days. Strong shoulders and an assured upper back can make many movements feel steadier, not only push-ups.
How long does it take to do a full push-up?
Many beginners get their first full push-up in four to eight weeks with steady practice. Your timeline depends on your starting strength, body weight, sleep, training history, and how often you practice clean reps.
Some people need a few months, and that still counts as great progress. You are building a useful skill. You are not racing strangers on the internet.
Track your workouts in your phone or notebook. Write down the variation, sets, reps, and how your form felt. Your memory will eventually insist that “nothing changed.”
When to get extra help
Talk with a qualified physiotherapist, doctor, or certified fitness professional if you have a shoulder, wrist, elbow, or chest injury. Ask a medical professional before you begin a new exercise routine if a health condition affects your activity level.
You can use push-up handles or hold dumbbells on the floor to keep your wrists in a more neutral position if wrist extension bothers you. Try each adjustment gently and stop if pain continues.
Strong form matters more than a flashy variation. A controlled wall push-up can challenge you much more than a floor push-up with collapsed shoulders and a banana-shaped spine.
Start your first push-up today
Start with the version that challenges you while you keep good form: wall, high incline, low incline, knees, negatives, then floor. Practice two or three times each week, add reps with patience, and lower the surface when you earn it.
Your first full push-up does not require magic, perfect genetics, or a motivational montage. It requires a sensible progression and enough consistency for the work to build.
Put your hands on a wall, do your first set today, and make gravity work for it.