

Most people either skip the basics or jump straight to something they’re not ready for. Both approaches get you nowhere fast. This push up progression fixes that. It meets you where you are and walks you all the way to one of the most impressive bodyweight moves you can do.
I’m talking about the one-arm push up. Yeah, that one. The move that makes people stop and stare. And the wild part? It’s completely achievable with a smart, structured plan, no gym membership required.

Why most push up progressions fail you
Most progression guides online treat push ups like a numbers game. Do 100 a day and you’ll get strong, right? Wrong. Volume without proper progression just reinforces bad habits and stalls your progress.
The real issue is that people skip the foundational strength work. They jump from knee push ups straight to standard push ups and wonder why they plateau. Every level in this progression exists for a reason, so don’t rush it.
Also worth noting: push ups are a full-body exercise. Your core, glutes, and legs all need to stay locked in for every single rep. If you’re just flopping up and down, you’re leaving serious gains on the table.
The full push up progression: stage by stage
This progression works because each stage directly builds the strength and body awareness needed for the next. Think of it like a staircase. Skip a step and you’ll trip. Follow it honestly and you’ll surprise yourself with how fast you move up.
If you’re completely new to push ups, check out this guide on how to do a push up for beginners first. It covers the wall-to-floor approach that sets a solid foundation before you even hit the ground.
Stage 1: Wall push ups
Yes, wall push ups. Don’t roll your eyes. They teach your body the correct pushing pattern without the full load of your bodyweight, and that matters more than people give them credit for.
- Stand arm’s length from a wall
- Place hands at shoulder width, slightly below shoulder height
- Keep your body in a straight line from head to heels
- Lower your chest to the wall, then push back
Goal: 3 sets of 20 clean reps before moving on. Once this feels easy, you’re ready for the floor.
Stage 2: Incline push ups
Incline push ups use a bench, chair, or step to reduce the load. The lower the surface, the harder the push up, so start high and work your way down over time.
This is where you really start building chest, shoulder, and tricep strength. Don’t rush this stage. Strong incline push ups lead to better standard push ups, full stop.
Goal: 3 sets of 15 reps with a controlled 2-second descent.
Stage 3: Knee push ups (done properly)
Knee push ups get a bad rap, but only because most people do them wrong. Your hips should not sag. Keep your body in a diagonal line from knees to head with your core engaged the entire time.
Goal: 3 sets of 15 reps before progressing. If your lower back aches, your core is switched off. Fix that first.
Stage 4: Full standard push ups
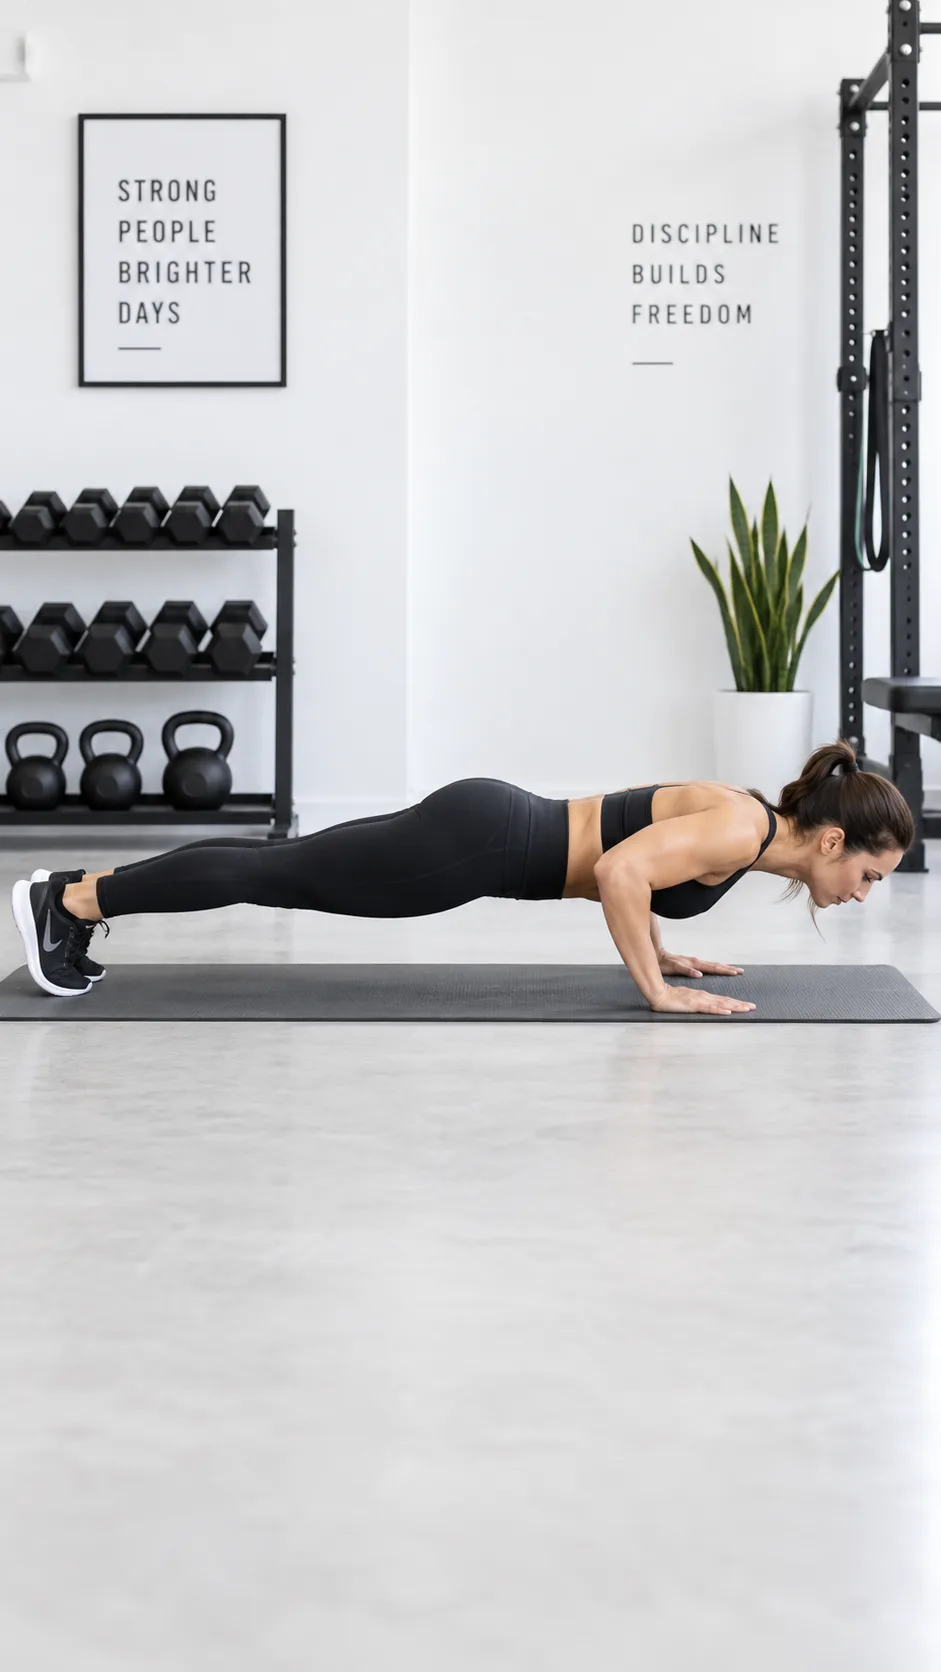
This is the foundation everything else builds on. Nail your form here and the rest of the progression becomes dramatically easier. According to ACE Fitness, a standard push up activates the pectorals, anterior deltoids, and triceps, making it one of the most efficient upper body moves you can do.
- Hands slightly wider than shoulder-width
- Body forms a perfect plank from head to heels
- Lower until chest nearly touches the floor
- Push up explosively, keeping elbows at roughly 45 degrees
Goal: 3 sets of 20 solid reps with zero form breakdown.
Stage 5: Diamond and close-grip push ups
These variations shift more load onto your triceps, a muscle group that plays a massive role in the one-arm push up. Diamond push ups also build the wrist and elbow stability you’ll need at every stage after this.
Goal: 3 sets of 15 reps. If your elbows flare wide, the load is too much. Drop back to standard push ups and build more base strength first.
Stage 6: Archer push ups
Now things get really interesting. Archer push ups bridge the gap between two-arm and one-arm pushing. You shift your weight to one arm while the other extends out to the side for light support.
This is where you start training one arm to handle a greater percentage of your bodyweight. Honestly, this is the most underrated stage in the entire progression. People skip it and then wonder why their one-arm push up attempt looks like a slow-motion collapse.
Goal: 3 sets of 8-10 reps per side.
Stage 7: Elevated one-arm push ups
You’re doing one-arm push ups now, just with your hand on an elevated surface to reduce the load. Start high (think countertop height) and gradually lower the surface week by week. This is progressive overload working exactly as it should.
Keep your feet wider than shoulder-width to help with balance. Research from NCBI shows that unilateral upper body exercises create significantly greater core activation than two-arm versions, so every rep here does double duty.
Goal: 3 sets of 5-8 reps per arm at each height before dropping lower.
Stage 8: The full one-arm push up
You’ve earned this. Set up with feet wider than hip-width, one hand behind your back, and the pushing hand positioned slightly past your shoulder line. Lower slow, press up strong.
The first full rep will feel incredible. Trust me on that. The journey from wall push up to one-arm push up is genuinely one of the most satisfying progressions in all of bodyweight training.

How long will this actually take?
Honest answer: it depends on where you start. Complete beginners who train consistently 3-4 times per week can realistically hit a full one-arm push up in 4 to 9 months. People with existing upper body strength often move through the early stages in weeks.
The deciding factor is consistency, not intensity. Showing up three times a week with focused effort beats hammering yourself once a week every single time.
Common mistakes that kill your progress
- Rushing stages: move up only when you hit the goal reps cleanly, not before
- Ignoring core engagement: your abs should stay braced on every single rep
- Flared elbows: protect your shoulders by keeping elbows at roughly 45 degrees
- Shallow reps: full range of motion only, always
- Skipping rest days: muscle grows during recovery, not during the workout
Supporting work that speeds up your progress
Push ups don’t exist in a vacuum. Pulling strength and shoulder stability directly support your pushing ability. Want to accelerate your results? Pair this progression with a structured pull up progression. Balancing pushing and pulling keeps your shoulders healthy and strong over the long run.
Core work also matters enormously. Planks, hollow body holds, and ab wheel rollouts all carry over directly to push up performance, especially at the one-arm stage where rotational control becomes critical. The Healthline core training guide covers solid foundational moves worth adding to your routine.
And if you enjoy mobility work alongside your strength training, the principles in this guide on how to do a backbend safely are a good reminder that controlled progressions apply to every challenging movement, not just push ups.
Sample weekly training structure
- Monday: Push up progression work (current stage) + core
- Wednesday: Pull up progression + shoulder stability exercises
- Friday: Push up progression + accessory tricep and wrist work
- Weekend: Active recovery, mobility, or light movement
Simple, sustainable, and three sessions a week sounds almost too manageable. But consistency at this frequency will absolutely get you to your first one-arm push up. Most people overcomplicate it. You don’t need to.
The one-arm push up is closer than you think
The one-arm push up isn’t some elite move reserved for gymnasts and calisthenics athletes. It’s the natural endpoint of a logical, well-structured progression that anyone willing to put in consistent work can reach.
Stop skipping stages. Stop obsessing over numbers. Focus on quality reps, progressive stages, and showing up regularly, and you’ll get there faster than you expect.
Start at whatever stage honestly matches your current ability, follow the progression faithfully, and check back in with this guide as you level up. Your first one-arm push up is waiting for you.